这篇文章主要是记录使用tensorflow2的一些笔记吧,因为有时候是真的容易忘。
tf.keras.Embedding(input_dim=vocab_size,ouput_dim=embedding_size,input_length=input_length)
这是嵌入层,只能作为第一层。并且输入的形状只能是(batch_size,seq_length).
tf.keras.prerocessing.sequence.pad_sequences(x_train,maxlen=maxlen)
x_train只能是一个二维tensor,maxlen表示最终要得到的桔句子长度。
tf.keras.layers.Bidirectional(layer,merge_mode=”concat,None,mul,sum”)
比如传入LSTM的话,那么就可以得到biLSTM。如果是None的话,那么就返回两个值。
t f.keras.layers.LSTM(units,acitavtion,return_sequences,return_state,go_barckwards) 链接
units表示LSTM输出的维度;acitvation表示激活函数,默认是tanh;return_sequences表示是否返回整个输出序列,默认为false;return_state表示除了输出外,是否输出最后一个状态,默认false。如果return_sequences与return_state均是True的话,那么返回值有三个:整个输出序列,最后输出、最后一个状态。go_backwards为True,表示将输入给LSTM的输入反向。见stackoverflow的解答
举个🌰:👇
1
2
3
4
5
6
7
8
9
10
inputs = np.random.random([32 , 10 , 8 ]).astype(np.float32) lstm = tf.keras.layers.LSTM(4 ) output = lstm(inputs) lstm = tf.keras.layers.LSTM(4 , return_sequences=True , return_state=True ) whole_sequence_output, final_memory_state, final_carry_state = lstm(inputs)
tf.keras.layers.MaxPool2D(pool_size=(),strides=(),padding=”valid”)
输入的维度是4维的(batch_size,rows,cols,channels),并且pool_size与strides都是tuple,这一点要记住,最后输出的维度是(batch_size,new_rows,new_cols,channels)。
callbacks的写法
tf.keras.callbacks.EarlyStopping(monitor=’val_loss’,min_delta=0,patience=3)
其中,monitor表示要检测的指标,min_delta表示在被监测的数据中被认为是提升的最小变化,即绝对变化小于min_delta,将被视为没有提升;patience表示没有进步的训练轮数,在这之后训练就会被停止。
tf.keras.layers.Conv1D(filters=250,kernel_size=3,padding=’same’,strides=1)
一维卷积,输入的维度为(batch_size, steps, input_dim),输出维度为(batch_size, new_steps, filters)。
tf.keras.layers.MaxPool1D(pool_size=2,strides=1,padding=’valid’)
输入维度为(batch_size, steps, features),输出维度为(batch_size, downsampled_steps, features)。
argparse的使用
1
2
3
4
5
6
import argparseparser=argparse.ArgumentParser(description="" ) parser.add_argument("--name" ,type =int /str ,help ="name" ,default=xxx,required=True /False ) args=parser.parse_args() print(args.name)
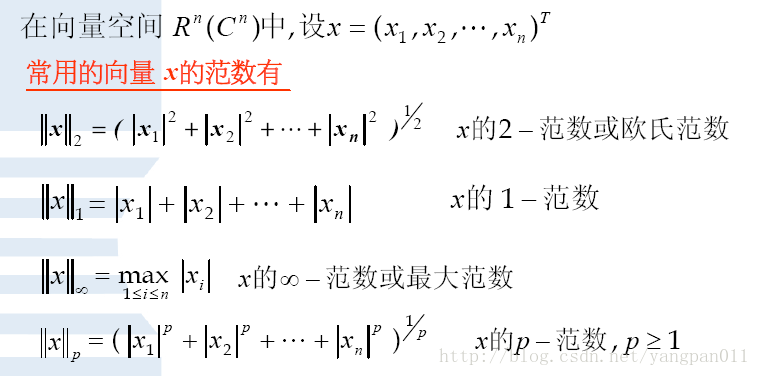
范数的概念
0范数,向量中非零元素的个数。
1范数,为绝对值之和。
2范数,就是通常意义上的模。
无穷范数,就是取向量的最大值
1 2 3 import tensorflow as tfa=tf.norm(x,ord =1 )
np.argsort的使用
y=np.argsort(X)的作用是:将X中的元素从小到大排序后,提取对应的索引index,然后输出到y。
[::-1]是从最后一个元素到第一个元素复制一遍,即倒序。
json的使用 链接
推荐使用json,而不是pickle,因为json得到的文件所有通用,而pickle得到的文件只能是python使用!
json.dumps(obj) :序列化成字符串
json.dump(obj): 序列化字符串到文件中
json.loads(json_str): 将json_str反序列化成原本的对象
json.load(file): 读取json文件,并反序列化成原本的对象
1
2
3
4
5
6
7
8
9
10
11
12
import jsona={"a" : 1 , "c" : 0 , "b" : 2 } json_str=json.dumps(a) with open ("a.json" ."w" ) as f: json.dump(a,f) with open ("a.json" ,"r" ) as f: a=json.load(f)
pickle的使用方法与json一致!但是写文件的时候,要使用”wb”,读文件的时候,要使用“rb”。
导入上级模块 链接 、链接2
1 2 3 4 5 6 import syssys.path.append(".." ) from a.ss import dasj
获取文件目录结构:tree
1
2
3
4
5
6
7
8
9
10
11
12
13
14
15
16
17
18
19
20
21
22
23
24
25
26
27
28
29
30
31
32
33
34
35
36
37
38
39
40
41
42
43
44
45
46
47
48
49
50
51
52
53
54
55
├── .DS_Store ├── CDSSM │ └── CDSSM.py ├── CompAgg │ ├── 1.py │ └── CompAgg.py ├── DSSM │ └── DSSM.py ├── DecAtt │ ├── DecAtt.py │ ├── __pycache__ │ │ └── DecAtt.cpython-37.pyc │ └── train.py ├── ESIM │ ├── .DS_Store │ ├── 1.py │ ├── ESIM.py │ ├── __pycache__ │ │ └── ESIM.cpython-37.pyc │ └── train.py ├── HCAN │ ├── 1.py │ └── HCAN.py ├── InferSent │ ├── InferSent.py │ ├── __pycache__ │ │ └── InferSent.cpython-37.pyc │ └── train.py ├── MatchPyramid │ ├── DynamicMaxPool2D.py │ ├── MatchPyramid.py │ ├── MatchingLayer.py │ ├── __pycache__ │ │ ├── DynamicMaxPool2D.cpython-37.pyc │ │ ├── MatchPyramid.cpython-37.pyc │ │ └── MatchingLayer.cpython-37.pyc │ └── train.py ├── SIamLSTM │ ├── SiamLSTM.py │ ├── __pycache__ │ │ └── SiamLSTM.cpython-37.pyc │ └── train.py ├── SSE │ └── SSE.py ├── SiamBILSTM │ ├── SiamBILSTM.py │ └── train.py ├── SiamCNN │ ├── SiamCNN.py │ ├── __pycache__ │ │ └── SiamCNN.cpython-37.pyc │ └── train.py ├── __init__.py └── __pycache__ └── __init__.cpython-37.pyc
tf.norm
最近频繁涉及到什么余弦相似度的计算之类的,所以计算tensor的模是必须的,这里小小的总结一下:
1
2
3
4
5
6
7
8
import tensorflow as tfimport numpy as npa=np.ones((100 ,60 ,30 )) b=tf.norm(a,ord =2 ,axis-1 ,keepdims=True ) c=tf.math.sqrt(tf.math.reduce_sum(tf.math.square(a),axis=-1 ,keepdims=True )) print(b==c)
tf.norm是用来计算tensor的模的,具体来说是:tf.norm(tensor,ord=2,axis=-1,keepdims=True).其中,ord=1表示计算其l1范数,等于2表示计算l2范数;axis=-1表示从最后一维计算;keepdims=True表示计算之后的tensor的维度的个数不变。
关于padding与mask
看到一篇关于mask的应用场景与方案,写的很好,记录一下🤩链接:padding与mask
关于encode与decode
参考链接
总的来说,如果str是字符串,如果我们要直接对它进行操作的话,就不需要encode或者decode,除非我们要将str保存到文件,那么我们就需要对其进行encode,在python代码里,具体是:with codecs.open(foel_patj,"w",encoding="utf-8") as f:。
如果我们str是bytes,那么我们要洗那个对其进行操作的话,那么我们就需要对其进行decode,从而得到字符串,具体就是:u1=str.decode("utf-8")。
我们具体在使用的时候,我们可以这样:(text是一个对象)
1
2
3
4
5
6
7
8
9
10
11
12
13
if six.PY3: if isinstance (text, str ): return text elif isinstance (text, bytes ): return text.decode("utf-8" , "ignore" ) else : raise ValueError("Unsupported string type: %s" % (type (text))) elif six.PY2: if isinstance (text, str ): return text.decode("utf-8" , "ignore" ) elif isinstance (text, unicode): return text else :
关于TFRrecord的使用
1
2
3
4
5
6
7
8
9
10
11
12
13
14
15
16
17
18
19
20
21
22
23
24
25
26
27
28
29
30
31
32
33
34
35
36
37
38
39
40
41
42
43
44
45
46
47
48
49
50
51
52
53
54
55
56
57
58
59
60
61
62
63
64
65
66
67
68
69
70
71
72
73
74
75
76
77
78
79
80
81
82
83
84
def build_tfrecord (file_path, word_dict_path, max_utterance_num=10 , max_utterance_len=50 ): ''' 建立TFRecord文件,方便读取 :param file_path: 数据集的文件路径 :param word_dict_path: word dict的文件路径 :param max_utterance_num: context中utterance的最大数目 :param max_utterance_len: 句子的最大长度 :return:无 ''' data = load_data(file_path) word_dict = load_dictionary(word_dict_path) print("start bulid TFRecord!" ) base_path = os.path.dirname(file_path) base_name = os.path.basename(file_path) target_path = base_path + "/%s.tfrecord" % base_name writer = tf.io.TFRecordWriter(target_path) for item in data: context_indexes_new, context_len_new = context_to_index(item["context" ], word_dict, max_utterance_num,max_utterance_len) response_indexes_new, response_len_new = response_to_index(item["response" ], word_dict, max_utterance_len) label = int (item["label" ]) features = { "context" : tf.train.Feature(bytes_list=tf.train.BytesList(value=[context_indexes_new.tostring()])), "context_len" : tf.train.Feature(bytes_list=tf.train.BytesList(value=[context_len_new.tostring()])), "response" : tf.train.Feature(bytes_list=tf.train.BytesList(value=[response_indexes_new.tostring()])), "resonse_len" : tf.train.Feature(int64_list=tf.train.Int64List(value=[response_len_new])), "label" : tf.train.Feature(int64_list=tf.train.Int64List(value=[label])) } tf_features = tf.train.Features(feature=features) tf_example = tf.train.Example(features=tf_features) tf_serialized = tf_example.SerializeToString() writer.write(tf_serialized) writer.close() def get_tfrecord_parser (max_utterance_num,max_utterance_len ): ''' 解析tfrecord文件 :param max_utterance_num: context中utterance的最大数目 :param max_utterance_len: 句子的最大长度 :return: parser ''' def _parser (example_proto ): feature={ "context" :tf.io.FixedLenFeature(shape=[],dtype=tf.string) "context_len" :tf.io.FixedLenFeature(shape=[],dtype=tf.string) "response" :tf.io.FixedLenFeature(shape=[],dtype=tf.string) "reponse_len" :tf.io.FixedLenFeature(shape=[],dtype=tf.int64) "label" :tf.io.FixedLenFeature(shape=[],dtype=tf.int64) } parsed_example=tf.io.parse_single_example(serialized=example_proto,features=feature) context=tf.reshape(tf.io.decode_raw(parsed_example["context" ],tf.int32),shape=[max_utterance_num,max_utterance_len]) context_len=tf.reshape(tf.io.decode_raw(parsed_example["context_len" ],tf.int32),shape=[max_utterance_num]) response=tf.reshape(tf.io.decode_raw(parsed_example["response" ],tf.int32),shape=[max_utterance_len]) response_len=parsed_example["response_len" ] label=parsed_example["label" ] return context,context_len,response,response_len return _parser def get_batch_dataset (tfrecord_file,parser,batch_size,is_test=False ): ''' 建立batch的数据 :param tfrecord_file: tfrecord文件 :param parser: parser :param batch_size: batch size的大小 :return: batch dataset ''' if is_test: dataset=tf.data.TFRecordDataset(tfrecord_file).map (parser).batch(batch_size) else : dataset=tf.data.TFRecordDataset(tfrecord_file).map (parser).batch(batch_size) return dataset
np.random.choice
参考链接:链接
fzf的使用
ctrl+r:显示所用历史命令
tt:快速浏览当前目录下的文件,(具体可以自己设置)
ctrl+t:快速选择当前目录下的文件
cd ** :模糊查找文件
tensorflow中获取shape的方法
在tensorflow2中,获取tensor的shape的大致分为两类:静态方法与动态方法
所谓的静态方法是:a.shape.as_list(),a.get_shape;
所谓的动态方法是:tf.shape(a).numpy()
推荐使用tf.shape来获取tensor的维度,因为如果使用静态方法来做的话,如果之后要使用tf.reshape这样的op,那么会报错。
tf.slice(a,begin=[],size=[])
begin的个数与a的维度的个数相同,表示从这个维度第几个开始,size表示在每一个维度取得的数目
1
2
3
4
5
6
7
import tensorflow as tfdata=tf.reshape(tf.range (0 ,9 ),shape=[3 ,3 ]) sliced_data=tf.slice (data,begin=[1 ,1 ],size=[1 ,2 ]) print(sliced_data)
tf.gather(tensor,[1,2,3])
表示从tensor里面取出索引为[1,2,3]的tensor,例子如下:
1
2
3
4
5
6
7
8
9
10
11
12
13
14
15
16
import tensorflow as tfdata=tf.reshape(tf.range (0 ,9 ),shape=[3 ,3 ]) print(data) e=tf.gather(data,[0 ,1 ]) print(e) ''' tf.Tensor( [[0 1 2] [3 4 5] [6 7 8]], shape=(3, 3), dtype=int32) tf.Tensor( [[0 1 2] [3 4 5]], shape=(2, 3), dtype=int32) '''


